Sunday, July 26, 2009

Colourful fabric bits

Hello, back from the illnesses that have gripped my family and myself for nearly two weeks. The silence from the lack of coughing in our home is lovely.

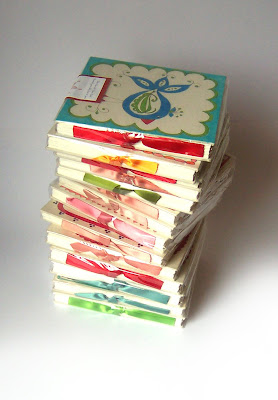
A little while ago I wrote about some fabric bits and pieces that I have left over from some experimenting. I also wrote that I was going to put all the pieces together and make some wall hangings. That is still the plan I'll just have to wait till I find the time! For now I'd like to share with you all the results of all my dabblings with fabric, paint, lino, brushes, fabric markers, stencils and a silk screen. One thing I must say about them all is that I love each one. None of them are particularly ambitious pieces of art. They were not thought out or designed. I made each one because I felt that I wanted to and I used the medium that suited me at the time. I had no particular expectation of any of them and just accepted each one as it turned out. I'm not good at drawing but I'm good with colour and the older I get the less I am bothered about the abilities I supposedly lack. This is something that I have only just recently realised about my work and it has deepened my love for it. I realised that I really don't expect wonders from any piece that I undertake. I noticed that I allow myself to draw or paint however I see fit and don't WANT a "result". Does that make sense? It frees me to think about my approach in this way. And the freer I feel the more I love what I do. Anyone can recreate any of the pieces shown below and if it will give you joy please feel free to copy any of the designs shown in this post. Or make your own. All you need is some fabric and some paints or markers and of course freedom in your artistic heart :)


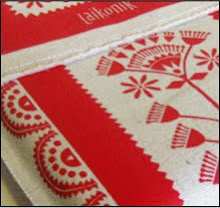
These are all drawn onto the fabric first and then filled in with fabric markers. Inspired by Polish folk embroidery.


These were cut out from a stencil paper available from art shops. It's like a plastic kind of paper that gives you a sharp edge when you print it. I put the cut out onto the fabric and then squeegied some paint through a silkscreen. The one below uses the same method.


These were just painted straight onto the fabric with a brush.


Again drawn with a fabric marker and then filled in with more fabric markers. I then stitched it onto some nice orange fabric.


Drawn and painted again.

These two are my favourite because they're so happy and vibrant.


More cutouts stencilled onto fabric.

The one on the right is a lino cut printed onto calico.

Saturday, July 18, 2009

That dreaded flu

Just a quick hello today to all my wonderful visitors. I don't know anyone in Sydney who isn't sick with some type of cold or flu. My children, partner and I are all sick and we are taking it easy until we recover. I have not seen a flu epidemic like this before. I hope where ever you are the nasty flu virus won't get you and if it has I hope you get well soon. I will blog hopefully in the next few days. Take care and stay warm if you're in the winter season!

Sunday, July 12, 2009

Changing styles and colours

When I started Laikonik 3 years ago I had no idea of what exactly it was that I was going to be selling or making, who I would sell it to or where I would sell it. The very first things I made and sold were these small hand made photo albums which were covered in hand painted cotton. I fell in love with the process of painting on fabric and have never really deviated from that too much.

My very first stall was at the St Ives Heritage Craft Fair market in Sydney. Only my friends who came to the market to share my excitement bought from me. No one else did. But that wouldn't stop me. i loved making and decorating things. Anything really but the whole thing about paper and fabric and painting and gluing and creating something useful made me feel great inside. So below are images of the very first albums and notebooks that I ever made.
I haven't looked at them for a long time and when I dug out these images today I realised just how much I adored seeing them all together on my little market stall each month. I also just realised that colour is what I love most about my designs.


These were A4 dry mount photo albums. I made the pages in different colours to make them different from the standard black.


Smaller photo albums. Also dry mount but A5 in size.


Notebooks covered in hand painted cotton which was always fun to paint. These notebooks were stitched by hand and included a button for winding the cotton around and "closing" the book.


These were great and always sold very well. Tiny little pocket books about A6 in size with multi coloured paper inside.


Mixed collection of all the photo albums and notebooks.

Later on when I started making the Once-A-Year books (for chronicling the first 18 years of a child's life) I would hand paint the covers. Since I was only selling about 5-10 books a month I could get away with that and the covers were always different. Below are some of the designs I used to sell. Now I have the designs screen printed onto the fabric in various different designs and colours. The books now sell all over Australia and in Belgium and have been featured in several popular printed publications as well as on other blogs.

The very first Once-A-Year book designs.

Later I made the designs more elaborate as I started having fun with fabric paints and fabric paint pens.


These designs were a short fad, although I always loved them they were too labour intensive to keep up on a regular basis. By this stage I started thinking of screen printing.


A few more of the early hand painted range.


What I realised having looked at all these designs from the past is that I truly love colour. And so I have decided to start injecting more of it back into all my new designs which I am working on at the moment. Will keep posted about this...

If you would like to see the current design range of the Once-A-Year books please visit my website http://www.laikonik.com.au/

I am also planning on bringing back notebooks and pocket books for possibly this Christmas. If you'd like to be notified of all my new products and special offers please go to the website's contact page and email me to join the mailing list.

Sunday, July 5, 2009

DIY flower crown

Quite some time ago I made this flower crown as a gift for my daughters friends 5Th birthday. The crown was modelled on a traditional headpiece worn by traditional brides from the Lowicki region in Poland. (see image below).


My crown was nowhere near as decorative or beautiful as the real thing but I figured it would be something a little 5 year old girl would love. It was made more special because my daughter and I made it together.


The crown is made entirely from felt. The flowers, hearts and felt ribbons at the back are just cut by hand with no particular stencil or pattern. The actual crown piece (in orange) is cut from a heavy weight felt that I don't know the name of. I bought it in Spotlight (a large fabric store in Australia) and they didn't know what it was called either. If anyone knows could you leave a comment? It kind of feels almost like a felty carpet. All the decorations are just stitched on.


We cut the flowers out first and then matched up the colours and decided where they would go by placing them onto the crown piece while it was laid out flat. We glued the flowers on lightly with little dabs of glue just to position them into place and then I stitched each flower on. From the inside you can see that I covered up the stitches of each flower by gluing a felt spot onto each cross stitch. This is not a difficult project but it's time consuming. Set aside an afternoon especially if you're doing it with your child :)


Most importantly the birthday girl loved it!